Introduction
Are you having trouble drawing a cupcake that looks good enough to eat? Whether you’re a beginner or an aspiring artist, drawing a cupcake may seem like a daunting task. But fear not! In this article, we will break down the process into easy-to-follow steps and offer tips and tricks to make your drawing experience a breeze. By the end, you’ll have a beautiful cupcake drawing that you can be proud of.
Step-by-Step Tutorial
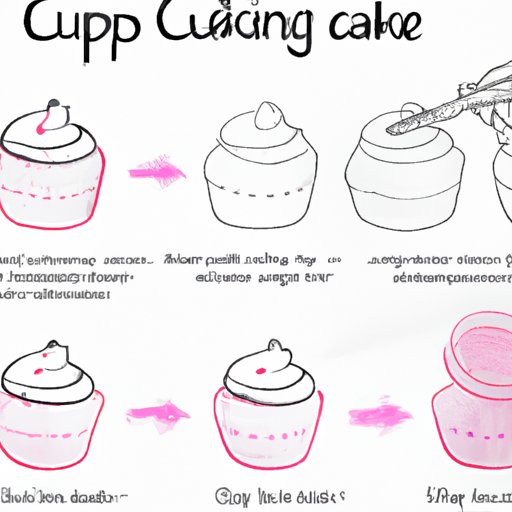
Let’s start with the basics. Here are the simple steps to follow for drawing a cupcake:
1. Draw a circle for the top of the cupcake
2. Draw a trapezium shape for the bottom of the cupcake
3. Draw lines to connect the two shapes together
4. Draw a cross on top of the circle to guide the placement of the cherry
5. Sketch out the cherry on top of the cross
6. Draw the cupcake wrapper by curving lines around the bottom trapezium shape
It’s as easy as that! Remember to take your time and go at your own pace. Let’s dive deeper into each step.
First, start by drawing a circle for the top of the cupcake. You can make the circle big or small, depending on your preference. Then, draw a trapezium shape for the bottom of the cupcake. This shape will guide the overall height of the cupcake.
Connect the two shapes together by drawing lines. These lines will determine the angle of the cupcake and give it its 3D shape. Make sure the lines are curved to give it a natural look rather than a stiff one.
Next, draw a cross on top of the circle to guide the placement of the cherry. This cross should be aligned with the overall shape of the cupcake. Sketch out the cherry on top of the cross. You can also make the stem thicker or thinner depending on your preference.
Now that the top of the cupcake is complete, let’s move on to the cupcake wrapper. Draw the wrapper by curving lines around the bottom trapezium shape. Make sure the lines are parallel to each other and have a slight curve. Voilà! Your basic cupcake drawing is complete.
Video Tutorial
If you’re a visual learner, we’ve got you covered. Check out our YouTube video tutorial for step-by-step guidance in drawing a cupcake. Along the way, we’ll also share tips and tricks to make the drawing process easier.
Different Cupcake Designs
Now that you’ve mastered the basic cupcake drawing, it’s time to add some flair. Let’s explore different cupcake designs that you can draw.
– Unicorn Cupcake: Add a unicorn horn and some ears to the cupcake to make it magical
– Halloween-Themed Cupcake: Draw a spider web or a ghost on top of the cupcake to make it festive
– Floral Cupcake: Add some flowers and leaves for a whimsical touch
– Ice Cream Cone Cupcake: Make the wrapper look like an ice cream cone and add a scoop of ice cream on top
The possibilities are endless. You can use any design you like for inspiration to make your cupcake unique.
Adding Color
Now that you’ve mastered the cupcake drawing, let’s add some color to bring it to life. There are various techniques to add color to your drawing, including using pencils, markers, or paint. Choose your favorite coloring tool and let’s begin.
Start by coloring the cherry on top. You can use a bright red color or mix a few colors to get the right shade. Next, use a slightly lighter shade to color the top of the cupcake. You can then use a darker shade to create shadows and depth.
When it comes to the cupcake wrapper, you can use different colors to create a pattern or add shading to make it look like it has creases. Think about what type of wrapper you want and how it would look in real life.
Common Mistakes to Avoid
It’s easy to make mistakes when drawing a cupcake, but don’t worry, we’re here to help you avoid them. Here are some common mistakes to be aware of:
– Uneven lines: Make sure your lines are curved and neat to give the cupcake a natural look
– Crooked wrapper: The wrapper should have a slight curve to it. Make sure it’s not completely straight or crooked
– Uneven coloring: When using different colors, make sure the colors blend well and there are no harsh lines
– No shadows: Adding shadows to the cupcake will bring it to life and make it look more realistic. Make sure to think about where the light source is to determine where the shadows go
Tips for Beginners
If you’re a beginner, don’t fret. Here are some tips to help you get started:
– Hold the pencil correctly: Hold the pencil firmly, but don’t grip it too tight. Use your fingers to guide the movement of the pencil
– Practice with shapes: Before jumping into cupcake drawing, practice drawing circles, triangles, and rectangles. This will help you get used to shapes and angles
– Start with simpler designs: Start by drawing a basic cupcake before moving on to more complex designs. This will help you build your skills and confidence.
Share Finished Drawings
We would love to see your finished cupcake drawings! Feel free to share your drawing on social media and tag us. It’s always helpful to get feedback from others and see how you can improve.
Conclusion
Drawing a cupcake may seem intimidating at first, but with our step-by-step tutorial, tips and tricks, and different design ideas, you’ll be a pro in no time. Remember to take your time, practice, and have fun with it.


