Introduction
For many of us, the perfect winged eyeliner has been an elusive goal. Sometimes one eye turns out beautifully, but the other is a disaster. And sometimes, no matter how hard we try, we can’t seem to get it right. But fear not, achieving the perfect winged eyeliner is possible. In this article, we’ll provide a comprehensive guide on how to do winged eyeliner for beginners and those struggling with it.
Step-by-Step Guide to Perfect Winged Eyeliner: A Beginner’s Tutorial
First things first, let’s take a look at the different types of eyeliner you can use. You can use pencil eyeliner, gel eyeliner or liquid eyeliner. All of them have different textures and helpful in achieving different types of looks.
Next, follow these simple steps to achieve flawless winged eyeliner:
- Clean your face and eyes thoroughly before starting.
- Start by applying a thin layer of primer on your eyelids. This creates a smooth surface and enhances the longevity of your eyeliner.
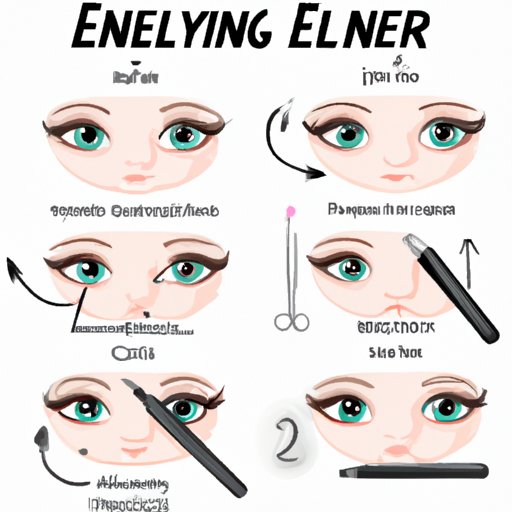
- Begin by drawing a thin line along the upper lash line. Start from the inner corner and move outwards in a steady motion.
- Next, draw a small diagonal line from the outer corner of your eye towards the end of your eyebrow. Be sure to angle it upwards at a suitable angle.
- Connect the diagonal line back to the thin line along the upper lash line.
- Fill in the space between the lines in the wing and the upper lash line
- Clean up any smudges or uneven lines with a cotton swab or makeup wipe.
Remember to go slowly and steadily to ensure clean and straight lines. It is okay if both eyes don’t look perfectly the same, we can always work on fine tuning the details with practice.
Tips for Beginners
Here are some tips to keep in mind as you’re practicing your winged eyeliner:
- Use your non-dominant hand to stretch the eyelid so you can draw the lines with ease.
- When in doubt, use tape to help guide your lines.
- If you have shaky hands, try resting your elbow on a flat surface to steady your hand.
- Practice, practice, practice! It may be frustrating at first, but the more you practice, the better you’ll get.
Top 5 Tips for Flawless Winged Eyeliner Every Time
While the above mentioned tutorial can be a great starting point, advanced tips can help you elevate the look of your eyeliner. Here are the top 5 tips for achieving flawless winged eyeliner every time:
- Choose the right eyeliner. Liquid eyeliner can prove to be the most difficult for beginners, you can start with a pencil liner or a gel liner first and eventually try liquid liners as well.
- Go slow, being in a hurry is usually the first step towards a smudged or crooked wing.
- Use tape for a guided line. Place a piece of tape under your eyes, towards the temple touching your lashes and angle it in such a way that it looks like an extension of your lower lash line. This will be your guide.
- Use a cotton swab for correcting mistakes. Don’t panic if you make a mistake, simply take a cotton swab dipped in make-up remover and use it to reshape or remove the excess eyeliner.
- Add mascara, it will help tie the whole look together well.
Winged Eyeliner: Tools of the Trade and How to Use Them
Here are different eyeliner tools you can use to achieve a flawless winged eyeliner:
- Eyeliner Brush: Use an angled brush for a softer look and a pointed brush for precision.
- Eyeliner Applicator: Use a pen applicator for finer lines and greater control and a brush applicator for more dramatic looks.
- Eyeliner pencil: These work well for people who aren’t confident with the brush applicator. They give less room for errors and are easier to control.
- Eyeliner itself: There are three different types of eyeliners – pencil, gel and liquid. And, it’s all about personal preference. Start with what you are comfortable with and gradually move on to try newer types later.
To use them optimally:
- Always clean your eyeliner brush with lukewarm water and soap. Set it aside to dry after every use.
- Always cap liquid eyeliners after use to prevent them from drying out.
- Sharpen your eyeliner pencil before every use to prevent infection from bacteria.
- Use a waterproof eyeliner to have it last full day without smudging.
Remember that every tool has its own pros and cons. It is all about personal preference and being comfortable with what works best for you.
From Thin to Thick: Experimenting with Different Winged Eyeliner Styles
Different winged eyeliner styles can compliment different looks and eye shapes. They can be thick, thin, short, long or shaped in many different ways. It is always good to play with different designs and find what works best for you. This can make an intimidating tutorial a lot more fun and personalized.
Before getting too overwhelmed, start with basics of the tutorial mentioned earlier and gradually try to experiment.
The Dos and Don’ts of Winged Eyeliner: Common Mistakes and How to Avoid Them
Here are some of the most common mistakes that people make with winged eyeliner:
Don’ts:
- Don’t stretch your eyelid too much. This might cause your final look to be uneven.
- Don’t start with a thick line. A thinner line will give you more control over the final look.
- Don’t rush the application. Take your time and aim for precision
Dos:
- Do follow the correct steps for cleanliness and primer application.
- Do practice often. The more you practice, the better you become.
- Do adjust thickness between each layer gradually.
Winged Eyeliner for Every Eye Shape and Size: A Comprehensive Guide
Winged eyeliner can be styled according to different eye shape, size and some other factors. For example, monolids require a different technique to create the wing and prominent eyes look better with double wing styles.
- Round eyes: Thin and elongated wings that draw attention to the outer edge, creating a more almond-shaped appearance.
- Almond eyes: Suits most types of winged liner. For a dramatic look, opt for a thicker flick.
- Monolids: Start by applying a primer or a white pencil to create a crease. Draw a thin line with a bent brush or pen at a 45-degree angle upwards for a perfect wing.
- Deep-set eyes: Use a winged liner to accentuate the crease of the eye and open the eye up.
- Prominent eyes: A double-wing effect looks wonderful with prominent eyes- more dramatic, thicker and bolder.
Conclusion
There you have it- a comprehensive guide on how to achieve the perfect winged eyeliner. Don’t be discouraged if it doesn’t turn out perfectly at first – it takes practice. Remember to give yourself time and space to experiment with different tools and styles.


