Introduction
Corn on the cob is a summertime staple that can be enjoyed all year round with the right cooking method. Many people struggle with cooking corn on the cob in the oven, either because they don’t know how to prepare it or because they’re unsure of the baking process. The great news is that cooking corn on the cob in the oven is easy and hassle-free when done correctly. In this article, we’ll provide a step-by-step guide and additional tips for cooking corn on the cob in the oven to achieve perfect results every time.
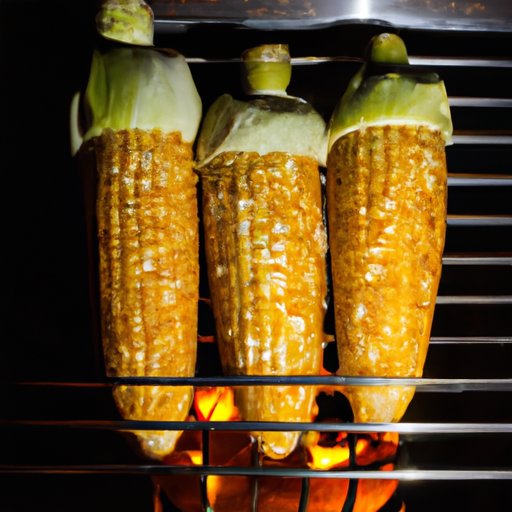
A Step-by-Step Guide to Cooking Corn on the Cob in the Oven
Before we start, it’s important to emphasize that high-quality corn on the cob is key to achieving the best results. When picking corn, look for firm and plump kernels that are tightly packed, with a bright green husk and golden brown silk. Avoid any corn with dried or shriveled husk or discolored kernels.
Here’s how to cook corn on the cob in the oven:
- Preheat your oven to 350°F.
- Remove the husk and silk from the corn.
- Brush the corn with melted butter or spray it with vegetable oil, then season it with salt and pepper or your preferred seasoning. You can also add minced garlic, chopped herbs, or grated Parmesan cheese for added flavor.
- Wrap each ear of corn tightly with aluminum foil, sealing the edges to prevent steam from escaping.
- Place the wrapped corn on a baking sheet and place it in the oven.
- Bake for 30-35 minutes, or until the kernels are tender when pierced with a fork.
- Unwrap the corn and serve hot with butter or your preferred toppings.
When it comes to baking the corn, it’s important to note that cooking time may vary based on the size of the corn and the oven’s heat. Therefore, check the corn’s tenderness periodically, with some kernels slightly charred but not burned. Overcooking can result in bland corn.
Experimenting with Different Seasonings
Plain butter and salt are classic and delicious seasonings for corn on the cob. However, if you’re feeling adventurous, you can experiment with other spices and herbs depending on your taste preference. Some great options to consider include:
- Garlic butter
- Lime and chili powder
- Parmesan and garlic
- Basil and lemon zest
- Cayenne pepper and honey
The seasoning you use can significantly affect the taste and texture of the corn, so be sure to try a variety for the best results.
Oven-Baked Corn on the Cob with Cheese
If you’re looking to take your corn on the cob game to the next level, then try baking it with cheese for added flavor and richness.
Here’s a cheesy corn on the cob recipe to get you started:
- 4 ears of corn
- 1/4 cup of butter
- 1 tsp of minced garlic
- 1 tsp of dried basil
- 1/2 tsp of dried oregano
- 1/4 tsp of salt
- 1/4 tsp of freshly ground black pepper
- 1/2 cup of grated Parmesan cheese
Instructions:
- Preheat your oven to 375°F.
- Remove the husk and silk from the corn.
- In a small saucepan, melt butter over low heat. Add garlic, basil, oregano, salt, and pepper. Cook until fragrant but not browned, for about 1-2 minutes.
- Using a pastry brush or spoon, spread the butter mixture evenly over the corn.
- Wrap each ear of corn with aluminum foil.
- Place the wrapped corn on a baking sheet and place it in the oven.
- Bake for 20-25 minutes.
- Unwrap the corn and sprinkle it with grated Parmesan cheese. Return it to the oven for an additional 5 minutes or until the cheese is melted and bubbly.
- Serve hot and enjoy!
The result is ooey-gooey cheesy corn that melts in your mouth.
How to Prepare Corn on the Cob Without Aluminum Foil
If you prefer not to use aluminum foil to cook your corn on the cob, there are other oven-safe options to consider. You can use a baking dish or pan lined with parchment paper or a silicone mat.
Here’s how to prepare your corn on the cob without aluminum foil:
- Preheat your oven to 350°F.
- Remove the husk and silk from the corn.
- Brush the corn with melted butter or spray it with vegetable oil, then season it with salt and pepper or your preferred seasoning.
- Place the seasoned corn in a baking dish or pan.
- Cover the dish or pan with a lid or aluminum foil, but not too tightly. This will allow the corn to steam and cook evenly.
- Place the dish or pan in the oven and bake for 30-35 minutes, or until the corn is tender.
- Uncover the dish or pan and serve hot with your preferred toppings.
Time and Temperature Guide
When baking corn on the cob in the oven, the temperature and time can affect the corn’s texture and taste. Based on the traditional approach, baking corn on the cob in the oven at 350°F for 30-35 minutes will produce tender and plump kernels.
It is important to note that the cooking time may vary based on the oven’s heat and the corn’s size. Larger ears may take longer, while smaller ears may require less time. Additionally, cooking times for fresh corn are different than those of frozen corn. Fresh corn, for example, requires less cooking time than frozen corn.
Serving Suggestions
Corn on the cob is a versatile side dish that pairs well with a variety of other foods. It is a common accompaniment to grilled meats, such as chicken or steak.
Here are some serving suggestions for cooked corn on the cob:
- Top with extra butter and salt.
- Drizzle with lime juice for a zesty flavor.
- Add a sprinkle of chili powder for a little heat.
- Brush with honey butter for added sweetness.
- Serve with a side of BBQ sauce for a tangy flavor.
- Garnish with chopped herbs, such as parsley or cilantro.
Conclusion
Now that you know how to cook corn on the cob in the oven, it’s time to get started in the kitchen. Experiment with different seasonings, try out the cheesy corn recipe, and explore new serving options for the perfect dish. With these tips, you’ll be serving up tender, juicy corn on the cob in no time.


