Introduction
A Dutch braid, also known as an inverted or inside-out French braid, is a popular hairstyle that looks intricate but is actually quite simple to create. It involves weaving the hair under each other rather than over, resulting in a 3D effect that makes the braid appear raised from the scalp. Dutch braids are versatile, suitable for different hair types and lengths, and can be worn for any occasion. In this article, we will provide you with a comprehensive guide on creating a Dutch braid.
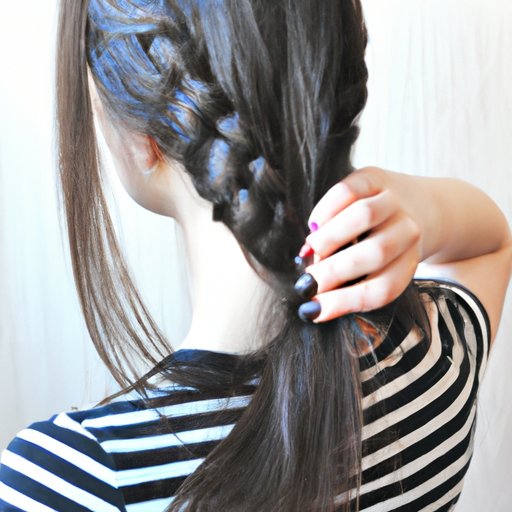
Step-by-Step Tutorial
To create a Dutch braid, you’ll need a comb, hair elastics, and hairpins. The braid is created by taking small sections of hair and crossing them over each other, alternating between the left and right sides of the braid. Follow these steps:
Step 1: Start by combing your hair to remove any tangles. Divide the hair into three equal sections at the crown of your head.
Step 2: Take the right section of hair and cross it under the middle section, then take the left section of hair and cross it under the middle section.
Step 3: Grab a small section of hair from the right side of your head and add it to the right section of the braid. Cross this combined section under the middle section.
Step 4: Repeat step three on the left side of your head, adding a small section of hair to the left section of the braid and crossing the combined section under the middle section.
Step 5: Continue adding small sections of hair to both sides of the braid until you reach the nape of your neck.
Step 6: Once all of your hair is incorporated into the braid, continue braiding a regular three-strand braid until the end.
Step 7: Secure the end of the braid with a hair elastic and wrap a small section of hair around the elastic to hide it. Secure the wrapped hair with a hairpin.
Note: If you have layered hair, you may need to adjust the thickness of each section of hair as you braid to ensure that the braid looks neat and even.
Video Tutorial
For a more visual understanding of how to create a Dutch braid, this video tutorial provides a step-by-step guide:
Infographic
This infographic summarizes the steps for creating a Dutch braid, including the tools and materials required:

Tips and Tricks
Here are some tips and tricks that will help you create a perfect Dutch braid:
- Make sure your hair is tangle-free before starting the braid to avoid any bumps or snarls.
- Take smaller sections of hair to create a tighter braid or larger sections for a looser braid.
- Don’t pull too tightly while braiding, as it can create tension headaches.
- If you’re having difficulty holding all three sections of hair at once, secure the two sections you’re not working with a hair clip or elastic.
- Once you’ve braided to the desired length, you can tug at the sides of the braid to loosen it up and create a more relaxed look.
- Use hairspray or hair styling cream to tame any flyaways that may create a messy appearance.
- Keep the braid in place by securing it with bobby pins or applying a hair serum, which will help to tame frizz.
Compare and Contrast
While a Dutch braid may appear similar to other types of braids, there are some key differences. Here’s a breakdown of some popular types of braids:
- Dutch braid: Three sections of hair are woven under each other, resulting in a braid that appears raised from the scalp.
- French braid: Three sections of hair are woven over each other, resulting in a braid that sits flat against the scalp.
- Fishtail braid: Two sections of hair are woven over each other, creating a braid that looks like a fishtail.
The Dutch braid and the French braid are both variations of braids that involve weaving sections of hair over and under each other. However, the Dutch braid appears raised from the scalp due to its weaving pattern, while the French braid sits flat against the scalp. The fishtail braid, on the other hand, is created by weaving two sections of hair over each other, resulting in a braid that looks like a fishtail.
Troubleshooting
If you encounter problems while creating a Dutch braid, don’t worry. Here are some common issues and how to fix them:
- Bumps in the braid: This often happens when you pull too tightly on one section of hair while braiding. To fix this, gently tug on the sides of the braid to loosen it up.
- Uneven sections of hair: This may occur if you don’t take equal sections of hair or if you have layered hair. To fix it, use a comb to create equal sections or adjust the thickness of the sections as you braid.
- Braid is too tight: If your braid feels too tight and is giving you a tension headache, use your fingers to loosen the sections of hair in the braid. You can also try braiding with looser tension or using a styling cream to smooth frizziness.
- Braid comes undone: If your braid keeps coming undone, try securing it with bobby pins or adding more tension to your braiding technique.
Conclusion
A Dutch braid is a fun and fashionable hairstyle that anyone can create with a little patience and practice. With our step-by-step guide, video tutorial, infographic, tips and tricks, and troubleshooting advice, you’ll be able to master this trendy hairstyle in no time. Remember to experiment with various textures, thicknesses, and lengths to find the perfect Dutch braid for you.


