How to Draw a Fist: A Step-by-Step Tutorial
If you are an artist or aspiring one, drawing a fist is a valuable skill to have in your arsenal. It can add drama, power, and emotion to your artwork, and is an essential part of drawing fight scenes or action shots. However, for many artists, drawing a fist can be a daunting task. This guide will outline the steps necessary to draw a fist accurately, by breaking down its anatomy, common mistakes to avoid, and tips for adding personality to your fist.
A Step-by-Step Tutorial on Drawing a Fist
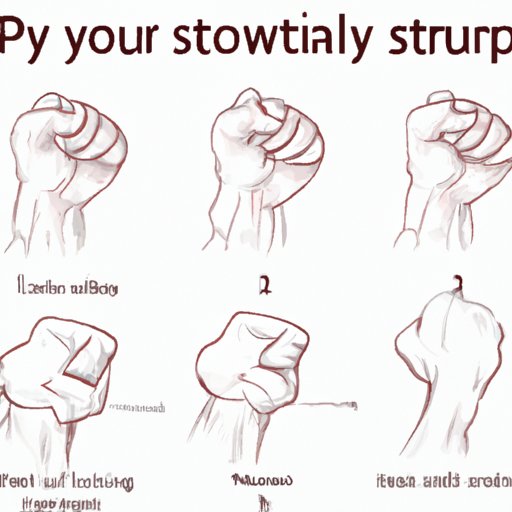
Before diving into the detailed tutorial, it is important to understand the basic outline of a fist. A fist is a compressed hand, made by curling the fingers inward and bringing the thumb across the fingers.
Begin with a lightly drawn circle to represent the palm of the hand, and then add the basic shape of the fingers, paying close attention to proportions. The fingers should taper towards the tips, and the middle finger should be the longest, with the pinkie finger being the shortest. Don’t forget to add some space between each finger, as they are not completely flat against each other.
Next, start to add some volume to your fingers and thumb, using light and rounded lines to represent their shape. Pay attention to the joint of each finger, as this will determine the position of the finger when the fist is closed. Once you have the basic shape of the fist, you can move on to shading and details.
Add some shading to your fist to give it depth and a more realistic look. Pay attention to the direction of the light source when adding shadows and highlights. Use cross-hatching techniques to add a rough texture to the skin, as fists are rarely perfectly smooth.
Remember to take your time, and use references if necessary. It may take several attempts to get the proportions and shading just right, but the more you practice, the better you will become at drawing a fist.
Breaking Down the Anatomy of a Fist
To draw a more accurate fist, it is important to understand the various parts of a fist. A fist consists of the palm, fingers, joints, knuckles, and thumb.
The palm is the flat, fleshy area that spans from the bottom of the wrist to the base of the fingers. The fingers consist of the phalanges, or bones, and the joints that connect them. The knuckles are the bony protrusions at the base of the fingers that support the fingers when they come into contact with an object. The thumb is a separate part of the fist and is responsible for providing extra force when the fist is closed.
Understanding each part of the fist will help you to draw it more accurately, allowing you to create fists that are more realistic, dynamic, and expressive.
Common Mistakes to Avoid When Drawing a Fist
Like any skill, drawing a fist takes practice. However, there are common mistakes that many artists make when attempting to draw a fist. One of the most common mistakes is incorrect proportions. Paying close attention to the size and position of the fingers, knuckles, and palm is essential when drawing a fist.
Poorly executed shading can also be a problem. Shading is what gives your fist dimension and shape, so it is important to use shading techniques that work for you. Practice shading on other objects, such as spheres or boxes, to get a feel for how to convey form and shape.
Finally, it is important to examine your reference material carefully. Don’t rely on a vague memory of what a fist looks like; study the way it looks from different angles and try to copy it as accurately as possible.
A Video Tutorial on Drawing a Fist
For a more dynamic experience and visual reference, make use of video tutorials. A video tutorial can be extremely helpful in better understanding the process and techniques involved in drawing a fist. This tutorial covers the basic steps, with additional tips and suggestions to keep in mind while drawing.
Remember to pause and rewind as necessary, so you can follow along at your own pace.
Studying Fists in Different Contexts
If you are looking to draw fists in different settings, such as cartoons or anatomy books, it’s important to analyze the different styles of fists that are used. This can give you a better idea of how to add flare to your artwork without losing the general structure and form of the fist.
When studying fists in different settings, pay attention to the differences between fists in comic books, cartoons, and anatomy books. This will help you develop a better understanding of how to represent fists in different contexts.
Adding Personality to Your Fists
One of the key advantages of drawing a fist, rather than using a stock image or clipart, is the ability to add personality. Even slight variations in the size, shape, and position of a fist can change the attitude and personality of the character.
Experiment with different variations when drawing a fist, both in terms of size and use of shadows and highlights. Consider which finger is bent, and how deeply, as an indication of what the character is feeling. Use shading techniques to create a sense of depth, and don’t be afraid to get creative with the angle of the fist.
Conclusion
Learning how to draw a fist can be a challenging but rewarding skill for any artist. By following these steps, you should now have a good understanding of how to draw the basic outline and anatomy of a fist, how to identify common mistakes when drawing a fist, and how to add personality and variation to your fists. Remember to practice regularly, and use references if necessary. With time and effort, you’ll be able to confidently add fists to your artwork.


