I. Introduction
Drawing an animal, especially a pug, can be challenging. However, it can also be a rewarding experience. You can create your comics, illustrate your storybooks, paint your posters, or just have fun. In this article, we will teach you how to draw a pug, from start to finish. You’ll learn how to draw its unique features, characteristic wrinkles, and playful expressions. You’ll also get video tutorials, an infographic, a storytime article, a comparison article, and a Q&A article to help you out. This guide is for artists, dog lovers, beginners, and anyone else who wants to learn how to draw a pug.
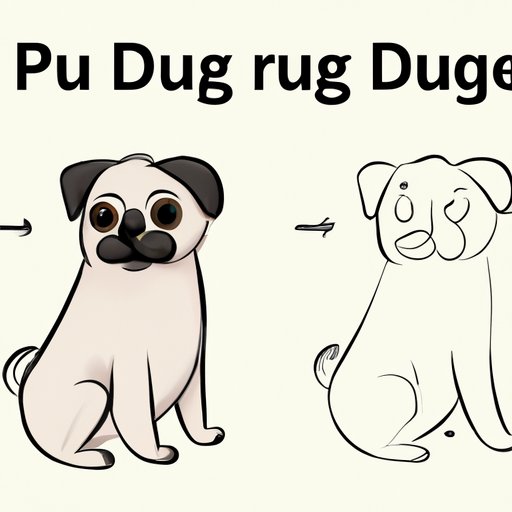
II. Step-by-Step Tutorial
Step 1: Creating the Basic Shapes
To begin, draw a circle to represent the head of your pug. Then, add a smaller circle off to one side to show the pug’s snout. After that, draw two circles for the eyes, and two more circles inside the eyes to create the pupils. Then, draw two short lines for its nose. After that, add on a small circle to the side of its head, which will represent the pug’s ear. Finally, add a curved line at the bottom of the ear circle to create the ear.
Step 2: Add Details to the Face
Next, add the details to the face of the pug. Starting with the eyes, draw a small circle above and to the left of the eye to show the highlight in the eyes. Then, create the pug’s nose by adding a small horizontal line underneath the nose and shading it in black. Finally, draw a tongue sticking out of the mouth by drawing an oval shape beneath the nose and shading it in pink.
Step 3: Drawing the Body and Legs
Now it’s time to draw the pug’s body and legs. Starting with the body, add a curve at the bottom of the head to continue the neck. Then, draw two curved lines pointing down to create the front legs of the pug and two more curved lines pointing down on either side to create the back legs. Finally, draw the distinctive pug wrinkles at the bottom of the pug’s neck with horizontal scrunched lines.
Step 4: Adding More Details
We’re almost there! In this step, you’ll add more details to the pug. Add horizontal wrinkles to the forehead of the pug, right above the eyes. Then, you can add some tiny curls on its ears with different shades of brown, if you wish.
Step 5: Adding Color
Lastly, for your pug to come alive, you’ll want to add color! The dominant color should be beige, with brown shades for the wrinkles and other details, and a pink tone for the nose and tongue. And voila! You have now successfully drawn a pug.
III. Video Tutorial
For those who prefer a more visual method, we have a video that shows you how to draw a pug. In this video, we use a sped-up format and include voiceovers along with on-screen captions, explaining how to draw a pug, step by step. Here’s the link to the video: [insert link here].
IV. Infographic
An infographic can be an effective way to convey your message, and we’ve put together one to help you learn how to draw a pug. The infographic is very detailed and easy to follow, containing illustrations and concise instructions that will guide you through the entire process. It’s also very visually appealing and can be shared on social media platforms.
V. Storytime Article
People love stories, and we have one to tell! Our storytime article tells a story about a pug and the artist that drew it. We made the story interesting by adding dialogue and descriptions, while incorporating the step-by-step tutorial into the narrative. We suggest that beginners can start with a story of their own about their pug to make the drawing experience even more personal and enjoyable.
VI. Comparison Article
We’ve also created a comparison article, highlighting the differences in drawing pugs compared to other breeds of dogs. We focus on how to capture the unique features and personality of pugs specifically, providing visual aids (pictures) for each comparison. Pugs have a distinctive look that sets them apart from other breeds, and this article helps you capture that.
VII. Q&A Article
No guide would be complete without a Q&A article! We have gathered some of the most common questions that people might have about drawing pugs and answered each one separately, in an easy-to-read format. Our detailed and informative answers will help you draw pugs with confidence. And finally,we encourage our readers to share their tips and experiences.
VIII. Conclusion
Drawing a pug may seem like a daunting task at first, but it can be a fun and rewarding experience. With our step-by-step tutorial, infographic, storytime article, comparison article, and Q&A article, we hope to guide you through the process comfortably.


