I. Introduction
Learning how to draw an ant can be a fun and rewarding experience. Not only can you hone your artistic skills, but you can also learn more about the fascinating world of ants. This article will provide you with a beginner’s guide to ant drawing, breaking down the process into manageable steps and providing tips and tricks for perfecting your technique.
II. 7 Simple Steps to Draw an Ant: A Beginner’s Guide
Before diving into the more complicated aspects of ant anatomy, it’s important to master the basics. Here are seven simple steps to help you draw an ant:
- Start by drawing the head and thorax using a circle and oval shape.
- Add a small line for the waist and draw the abdomen using a curved line.
- Create the antenna using two small lines attached to the head circle.
- Add details to the face – draw two small eyes, a small mouth, and two mandibles.
- Draw six legs next, making sure each leg has three segments.
- Add the stinger and any additional details to the abdomen as desired.
- Finally, shade in the appropriate areas to add dimension to your ant.
These seven simple steps should help you create a basic ant drawing.
III. From Line to Leg: Tips for Drawing Ants Like a Pro
Once you’ve mastered the basic ant shape, it’s time to improve upon the details. Here are a few tips:
- Use lines to direct the viewer’s eye and create the illusion of depth.
- Practice drawing ant legs by breaking them down into simpler shapes.
- Draw the leg segments slightly curved to add flexibility.
- Use shading to add depth and realism to your drawing.
Drawing ants like a pro takes time and dedication, but by practicing these tips, you’ll be well on your way!
IV. The Art of Ants: A Step-by-Step Tutorial
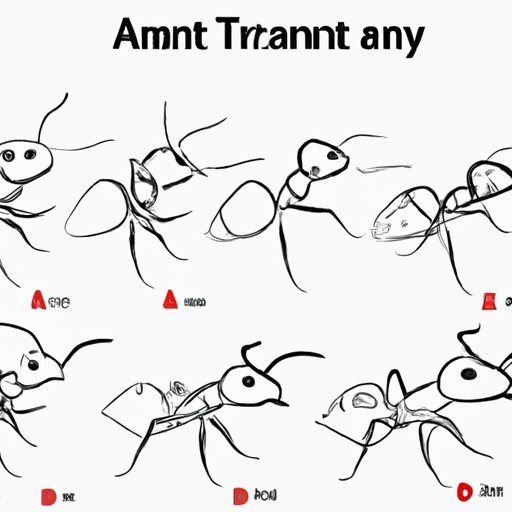
To continue with your ant drawing journey, let’s move on to a step-by-step tutorial:
- Begin with a small, bean-shaped oval for the head.
- Add a larger, slightly elongated oval for the thorax.
- Draw a small, curved line for the waist and a larger, curved line for the abdomen.
- Attach two small lines to the head for antenna and add two tiny circles to the tips for the antennae ball.
- Draw two small eyes, a small, curved line for the mouth, and two mandibles on the face.
- Next, draw the six legs using three curved lines each.
- For the stinger, draw a small, curved triangle at the end of the abdomen.
- Shade in the appropriate areas of the ant, and voila! You’ve drawn your own ant.
Use these detailed instructions to help guide you through the ant drawing process.
V. Drawing Insects: How to Master Ant Anatomy
While mastering the basic ant shape is important, it’s also crucial to understand the anatomy of these fascinating insects. Here are a few steps to help you get a grasp on ant anatomy:
- Study different ant species and try to identify the differences in their anatomy.
- Pay attention to the shape, size, and details of ant body parts.
- Practice drawing specific ant body parts, such as antennae or legs.
By studying ant anatomy, you’ll be able to create more detailed and accurate ant drawings.
VI. Get Creative with Ants: Fun Techniques for Drawing Your Own Colony
Now that you’ve become comfortable with drawing ants, it’s time to get creative! Here are a few techniques to try:
- Create your own unique ant colony with different ant species, sizes, and shapes.
- Use different shading techniques and colors to create a more vibrant and diverse colony.
- Draw ants in different positions and poses to make your drawing more dynamic.
Use these techniques to explore new ways to have fun with ant drawing.
VII. Ants in Action: Capturing the Movement of These Fascinating Insects
Ants are constantly on the move, making it important to learn how to capture their movements when drawing. Here are a few tips:
- Spend time observing ants in nature and make note of how they move.
- Try sketching ants in motion to capture their movement in your drawings.
- Use lines and shading to create the illusion of different types of movement, such as crawling or running.
Incorporating movement into your ant drawings will make them more dynamic and interesting.
VIII. Thinking Outside the Anthill: Unconventional Approaches to Drawing Ants
Artists can also push boundaries when drawing ants by trying different styles or techniques. Here are a few unconventional approaches to try:
- Create an abstract or surreal ant drawing.
- Combine different mediums, such as ink and watercolor, to create a unique texture and effect.
- Draw ants in different scales or sizes to create an interesting visual contrast.
Use your creativity to explore new ways of drawing these fascinating insects.
IX. Conclusion
Learning how to draw an ant is a fun and rewarding experience that can also help you learn more about the intricate world of ants. Whether you’re a beginner or an experienced artist, this article has provided tips and techniques to help you draw ants like a pro. Remember to practice and experiment with different techniques to take your ant drawing skills to the next level.


