I. Introduction
Drawing is an art form that requires focus and precise attention to detail. One of the most difficult parts for a beginner to draw is an ear accurately. Many people struggle with the ear shape, trying to make it look realistic and proportional. In this article, we will cover the step-by-step tutorial on how to draw an ear, tips from professionals, common mistakes to avoid, using reference materials, using different mediums, and practice exercises to help you master the art of drawing ears.
II. Step-by-Step Tutorial
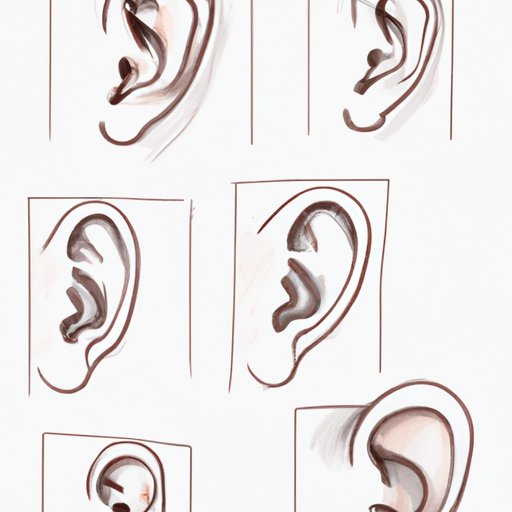
Start by drawing a simple half-circle to outline the shape of the ear. Then add the outer curve, which starts at the middle of the first line and moves down to the bottom of the half-circle. Add some more details to the ear such as the lobe, helix, tragus, antitragus, and conch, which gives contour to the shape of the ear. It’s important to use your pencil lightly, as most of these lines will be erased later on.
Here’s a step-by-step guide for drawing an ear:
- Begin by drawing a simple half-circle to outline the shape of the ear.
- Draw the outer curve, which starts at the middle of the first line and moves down to the bottom of the half circle.
- Add the lobe at the bottom of the ear.
- Add the helix, which is the outer rim of the ear.
- Sketch the tragus, a small cartilage protrusion that lies in front of the ear canal.
- Add the antitragus, a smaller cartilage protrusion on the inner side of the ear.
- Sketch the conch, which is the curved inner shell of the ear.
- Shade the ear once all of the details are complete.
III. Tips from Professionals
Professionals have learned how to draw ears by practicing the craft for years. Speaking with a professional artist or art teacher who has mastered drawing ears can offer helpful insights into how to properly execute the task. One valuable tip from artists is to study your reference materials carefully and to pay attention to details like shading and texture.
In addition, preserving a light and delicate touch is crucial for beginners. One artist recommends holding the pencil at a distance and holding it loosely to avoid smudging or leaving heavy marks on the paper. They further advise a beginner artist to use a lightbox to trace the shapes and details of the ear to help with hand-eye coordination and accuracy.
IV. Common Mistakes to Avoid
One of the most common mistakes beginners make when drawing ears is not paying attention to the shape and proportion. Many beginners tend to draw the ear too small or too large in comparison to other facial features, and forget to make the features symmetrical. Another mistake is over-shading, which can blur the details and make the ear look unrealistic. Another common error is adding too many details, making the ear look too cluttered.
One approach to overcoming these mistakes is to practice routinely with the aid of reference materials and to use under-sketching to establish shapes and contours before getting deep into details. Additionally, beginners must pay close attention to the natural curve and shape of the ear. Keep in mind that ears have a unique curvature, which can differ from individual to individual. It’s vital to ensure that the sketch is in proportion.
V. Using Reference Materials
Using reference materials is a useful technique for beginner artists to master drawing ears. They provide a visual representation of how to create the shape, proportion, and positioning of each part of the ear. A common practice for drawing ears is to use photographs as reference materials. Observation of the illustrations can help you recognize the variation in the structure of the ear and how to recreate it. You might also obtain reference materials with detailed guidance from professional artists. These resources include books, videos, and instructional tutorials online that aim to teach you how to master the art of drawing ears.
VI. Practice Exercises
When it comes to mastering the art of drawing ears, practice is essential. The internet has a wealth of resources on forums and social media focusing explicitly on drawing exercises. One exercise is to start with basic lines, circles, and shapes to create a realistic-looking ear. Another exercise is to draw multiple ears, varying the size and shape of each one. When practicing, be patient and remember to relax your grip on the pencil to preserve your lines’ delicacy. Keep practicing, and these exercises will help you improve your skills.
VII. Breaking down the Anatomy
Breaking down the anatomy of the ear through illustration and explanation can help with understanding the structure and shapes required to draw an ear. Illustrations break down the ear’s vital parts, including the helix, antihelix, lobule, and tragus. The diagram will present examples of how to ensure the ear’s components are symmetrical and accurately scaled. To improve your skills, take time to study the diagrams and practice drawing each section until you master every part.
VIII. Using Different Mediums
Experimenting with different mediums like charcoal, graphite, watercolor, and pastels can give depth, contrast, and dimension to an ear’s appearance. The right material can create dark or light shades, and textures that help make your sketch unique and realistic. Charcoal and pencils are versatile and can create various tones that capture the ear’s light and shadow accurately. Watercolor adds vibrancy to illustrations that you cannot achieve with pencils alone.
IX. Conclusion
Drawing an ear can be challenging, but with consistent practice paired with professional guidance and a positive attitude, the task will become manageable. This tutorial provides a step-by-step guide on drawing ears, tips from professionals, common mistakes to avoid, using reference materials, practice exercises, breaking down ear anatomy, and using different mediums. As with any art form, it takes time and deliberate practice to master the craft. Always remember to be patient, practice consistently, and enjoy the creative process of mastering the art of drawing ears.


