Introduction
Do you feel intimidated by the idea of drawing a turkey? You’re not alone! Many people struggle with breaking down the complex shapes and proportions of this festive bird. However, there is no need to fear, as this article will guide you through a step-by-step process that is both easy and fun.
This article aims to provide a comprehensive guide for anyone who wants to create a turkey drawing with ease. We will cover the essential basic shapes, shading, and highlighting tips, and even a creative twist for those of you who want to experiment. There are also practice exercises and variations to help you improve your skills even further. Lastly, with the holiday season approaching, we’ve included some ideas on incorporating the turkey in your festive decor. So, let’s get started!
Step-by-step guide
To begin drawing an easy turkey, you will need a few basic materials, including:
- Pencil
- Paper
- Eraser
- Black pen or marker (optional for outlining)
- Coloring materials (optional)
Once you have your materials ready, let’s begin by breaking down the turkey into basic shapes.
The shapes we will be using for the turkey are:
- Oval
- Circles
- Triangles
- Lines
By using these shapes as building blocks, we can simplify the drawing process into manageable steps.
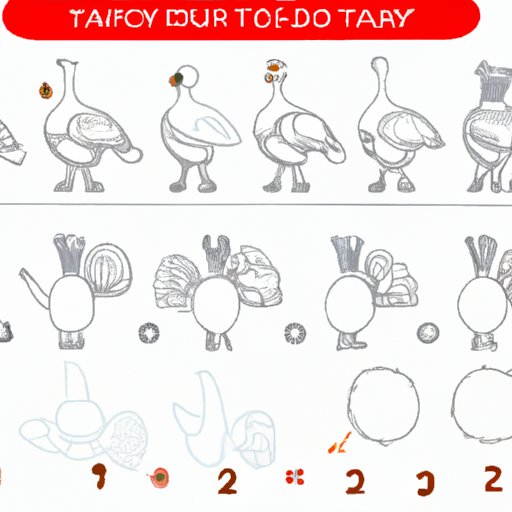
Follow these steps to create your easy turkey drawing:
- Draw a large oval for the turkey body.
- Draw a small circle for the head at the top of the oval.
- Draw a medium circle on either side of the turkey’s body, where the wings will be located.
- Draw a small triangle at the bottom of the oval for the beak.
- Draw an even smaller triangle inside the first triangle for the beak’s detail.
- Draw 2 circles inside the head circle for the turkey’s eyes. Add a dot inside each circle for the pupils.
- Draw a straight line below the beak for the turkey’s wattle. Then, draw two wavy lines on either side of the wattle for the turkey’s neck.
- Draw 2 lines on each side of the turkey’s head for the feathers. Then, connect the feathers to the small circles drawn in step 3 to form the wings.
- Draw a few curved lines for tail feathers extending from behind the turkey’s body. Add small details on the tail feathers by drawing small lines on each side of the curve.
- Shade the feathers and body to create depth and dimension. Use a light hand and gradually build up layers of shading. You can also add highlights using an eraser, creating a silky effect.
- Finally, if you want, outline your pencil drawing with a black marker or pen. This step is optional but will give the drawing a more defined look.
Video tutorial
For those who prefer visual aids, we’ve included a video tutorial below. The tutorial will provide voice-over commentary to explain each step, as well as additional tips.
Creative twist
Are you looking to express your creativity further? If so, try one of these twists on the traditional turkey drawing:
Cartoonize your turkey
To make a cartoon turkey, start by simplifying the shapes even more. Instead of shading the feathers, use few thick lines to define the feathers. Add a comical element by drawing the turkey with a goofy expression.
Follow these steps to create your cartoon turkey:
- Draw a teardrop shape with the thin end facing downwards at the center of the paper.
- Draw an oval shape above the teardrop shape for the head. Add two small circles to each side of the head for eyes. Draw a small triangle for the beak.
- Add exaggerated feathers on the head where the ears would be. These feathers can be curvy lines or sharp zigzags.
- Draw two clumsy legs. Each leg should be a simple shape – a bulb-shaped body with two straight lines going down for the legs. Add feet by drawing three toes on each leg.
- Shade the turkey’s body and feet. The feathers can be colored in shades of brown, orange, or any color of your choice!
Abstract your turkey
An abstract turkey offers more artistic freedom to those who enjoy bold designs. The abstract method encourages a free-flowing and imaginative approach to drawing. The key is to emphasize the unique shapes and angles and distort them in a captivating way.
Here are a few steps for creating an abstract turkey:
- Start by drawing any shape that reminds you of a turkey – it could be an oval, a zigzag or even dots. Draw it in a large size in the center of the paper.
- Draw some irregular shapes or lines around the main shape. Experiment with different colors and patterns.
- Add more details to make the drawing visually interesting. These include spirals, curves, and shapes that are not related to the turkey’s natural form.
- Imagine what colors can enhance the dynamic of the drawing. For example, autumn colors like oranges, browns, red, and yellow provide a warm and festive atmosphere.
- When you’re happy with your design, step back and observe the abstract turkey from different angles. Enjoy the unique perspective you’ve created. You can even name your artwork!
Practice exercises
As with any skill, practice is crucial for improving your drawing abilities. Here are some tips and exercises to help you practice drawing basic shapes and constructions:
- Draw simple shapes every day. Draw one oval, square, or triangle every day. Dedicate a page in your sketchbook or scrap paper to this exercise to monitor your progress over time.
- Learn to deconstruct and reconstruct an image. Choose a photograph of a complex object or animal and break it down into basic shapes. Rebuild the shapes to form the original image. This exercise will help you break down a massive task and simplify it into doable steps.
- Practice drawing from life. Pay close attention to the shapes, shadows, and proportion of the object you’re drawing. Don’t worry about the outcome – focus on the process itself, and you’ll see an improvement soon enough !
Variations
Now that you’ve mastered the basics of drawing an easy turkey, it’s time to experiment more with variations. Try out these variations, or create your own unique design!
- A flying turkey – Add wings to your turkey and draw it as if it’s flying.
- A cartoon turkey – Use the cartoonize method and create a fun turkey character with a specific style.
- A 3D turkey – Draw your turkey from different angles to create a 3D effect. Experiment with different perspectives and shadows.
Try following along with these step-by-step instructions for a couple of beginner-friendly variations:
Swirl feather
- Start by drawing a medium-sized circle at the center of the paper.
- Draw two wavy lines that resemble the figure “8” coming out of the circle at the top, following a curvy pattern. The same lines should come back down and cross at the bottom of the circle in crisscross pattern.
- From the bottom where the lines cross, draw a series of ovals connected to each other along the lines in a spiral pattern.
- Add details to each feather such as stripes or dots.
- Draw a small circle above the swirl feathers for the turkey’s head, and connect it to the feather with a straight line for the turkey’s neck. Draw the beak and wattles, then add in the eyes as dots or circles inside the head.
- Outline the turkey drawing with a black marker or pen for extra definition, then color it in any color you want. Don’t forget to label and date your masterpiece!
Patterned feathers
- Begin by drawing a large oval shape for the turkey’s body.
- Add two smaller circles on each side of the turkey’s body, where the wings will be located.
- Draw curved lines to create the feathers.
- Create detailed patterns within each feather form. You can test out polka dots, zigzags, or triangles.
- Draw the head and beak above the body shape and add the eyes as dots inside two small circles.
- Shade the feathers lightly for extra drawing depth, and color the turkey in a combination of colors and patterns of your choice.
Holiday-themed article
Here are a few ideas on incorporating the turkey in your holiday decor:
- Use your turkey drawing for a Thanksgiving greeting card.
- Display the turkey drawing on your wall as part of your Thanksgiving festive décor.
- Make DIY kid crafts, such as hand turkeys.
- Create a centerpiece for your Thanksgiving dinner table by printing out your finished drawing and attaching it to sticks as a holiday-themed display.
- Create a fun family activity by drawing turkeys together with your family members, encouraging everyone to try these variations and share their unique perspectives!
Conclusion
This article has provided a step-by-step guide for drawing an easy turkey. We’ve also included variations to let your creativity flow, practice exercises to develop your skills, and ideas for incorporating your artwork into holiday decorations.


