Introduction
Do you love horses and want to learn how to draw them? It can be a challenge to capture the grace and beauty of these majestic animals on paper. That’s why we have put together this step-by-step guide for beginners. Whether you are an aspiring artist or just looking for a new hobby, this article is designed to help you take your first steps in drawing horses.
Explanation of the problem and target audience
The problem is that many people find it difficult to draw horses that look realistic and detailed. This article is targeted at beginners who want to learn the basics of horse drawing.
Purpose of the article
The purpose of this article is to provide a step-by-step tutorial for drawing horses, using reference materials, understanding anatomy and proportion, practicing sketches, and drawing horses in different settings.
Brief overview of the topics that will be covered in the article
The article will cover the following topics: breaking down drawing horses into simple steps, using reference materials, understanding anatomy and proportion, practicing sketches, and drawing horses in different settings. By the end of the article, you should have a basic understanding of how to create realistic and detailed horse drawings.
Step-by-Step Tutorial
Explanation of the importance of breaking down drawing horses into simple steps
One of the best ways to approach drawing horses is to break the process down into simple steps. This makes the process less daunting and allows you to concentrate on each individual element of the drawing.
Step-by-step guide to drawing a horse
Here is a step-by-step guide to drawing a horse:
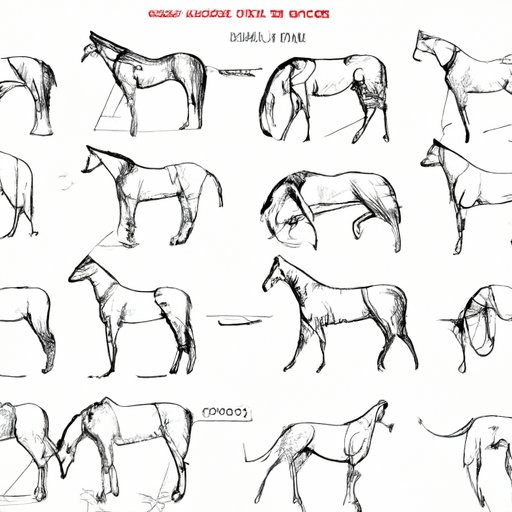
1. Sketching the basic shapes
Start by sketching the basic shapes of the horse. Draw a circle for the head, a rectangle for the body, triangles for the ears, and circles for the joints. Keep in mind that horses come in different shapes and sizes, so adjust your sketch as needed.
2. Adding details to create a realistic-looking horse
Once you have the basic shapes done, start to add details to make your horse drawing more realistic. Put emphasis on the horse’s musculature, the shape of the eyes and other facial features, and the texture and shade of the horse’s haircoat. Add details to the legs, hooves, and tail as well.
Tips for achieving a realistic result
- Study the anatomy of horses
- Use references from books, the internet or real life horses
- Start with simple sketches
- Use light shading to create depth and texture
Using Reference Materials
Explanation of why reference materials are important
Reference materials are a great resource when it comes to drawing horses. They can help provide inspiration, a framework for your drawing, and serve as a guide when it comes to anatomy, proportions, and other details.
Examples of various reference materials and how they can be used
1. Photographs
Photographs of horses can be found in various sources, including books, magazines, and websites. They can be used to study different breeds of horses, subtle differences in their anatomy and proportion, and understand the way they move.
2. Videos
Watching videos of horses in motion can be a great way to study their movements, gestures and postures. Seeing how a horse moves and interacts with its environment, can help you conceptualize a particular pose and improve your overall horse drawing skills.
Tips for utilizing reference materials effectively
- Collect quality references from multiple sources
- Sketch studies directly from references
- Keep a notebook or journal of your favorite references so you can more easily return to them
Anatomy and Proportions
Explanation of the importance of understanding horse anatomy
Understanding horse anatomy is crucial to drawing realistic looking horses. Without understanding the horse’s basic structure, it is difficult to create a believable and recognizable drawing.
Discussion of the key elements of horse anatomy and proportions
1. Head and face
The horse’s head is comprised of various parts such as the muzzle, eyes, nostrils, and ears and understand how they can affect the overall look of the drawing.
2. Body
The horse’s body is made up of different distinct shapes and lines, including the curve of its spine, the slope of its shoulder, and the width of its pelvis. Those body proportions dictate the horse’s overall stance, posture, and movement.
3. Legs and hooves
The legs and hooves must also be considered as they are significant parts of the horse’s anatomy. Consistently practice drawing these parts, and pay attention to the details like how the hooves fit the ground and the various angles the ankles can assume while walking, trotting and galloping.
Tips for applying knowledge of anatomy and proportions to create more realistic drawings
- Practice drawing individual parts of the horse
- Study horse anatomy through photos or diagrams
- Experiment with different poses and positions
Sketching Exercises
Explanation of the benefits of consistent practice
Becoming a better horse artist requires constant practice. Repetition improves the muscle memory and develops a sense of comfort and familiarity with drawing horses, leading to more natural and confident strokes in your later works.
Series of sketching exercises
1. Basic shape practice
Start by drawing circles, lines rectangles, and triangles to get the right proportion for your horse sketch. Practice drawing these shapes from different angles to develop spatial awareness.
2. Practice drawing individual parts of the horse
Break the horse’s body down into smaller sections and study the shapes, lines, and curve of each part.
3. Practice horses in motion
Try to experiment with different poses and movements to get a more dynamic and lively horse drawing. Observe how their muscles contract, the direction their limbs are pointing, and the position of their head and neck.
Tips for improving skills over time
- Set aside time to practice each day
- Experiment with different materials, such as graphite, charcoal or colored pencils
- Study professionals and other reference materials
Horses in Different Settings
Explanation of the importance of drawing horses in different settings
Drawing horses in different settings and contexts is essential to developing versatility in depicting them in various locations such as landscapes, and different scenarios such as running or resting.
Examples of different contexts in which horses can be drawn
1. Wild horses in a natural setting
Sketching the wilderness habitat and natural behaviors of horses such as grazing or drinking, may require an understanding of the natural surroundings in which they habitat.
2. Horses on a farm
The domesticated environment of horses in a farm, can be more controlled and manufactured, with the option to include additional elements like stables, or fences.
3. Horses racing
Racing brings forth a sense of motion and intensity, depicting the ruffled manes and sweating fur on the horse’s body gives the drawing a feeling of movement and thrill.
4. Horses in mythological or fantasy settings
There are no limits to your creativity, so you can take inspiration from various mythologies or imaginary elements to illustrate your horse and make it fun or imaginative.
Tips for approaching horse-drawing in different contexts
- Use visual cues and references to help flesh out the scene
- Don’t be afraid to experiment with different angles and compositions
- Consider the horse’s expression and body language in the different scenario
Conclusion
Recap of the main points covered in the article
In this article, we have discussed how to draw horses by breaking it down into simple steps, using reference materials, understanding anatomy and proportion, practicing sketches, and drawing horses in different settings.
Final tips for becoming a better horse artist
- Think of horse drawing as a skill to be developed over time
- Practice, practice, practice
- Don’t be afraid to experiment and take risks on your drawing
- Join an art/guild community that focuses on horse drawings
Encourage readers to keep practicing and learning
Keep in mind that practice is a vital component of improving your horse drawing and the journey of horse-drawing is never-ending.


