Introduction
Hemming a dress can be a daunting task for both beginners and seasoned seamstresses. The fear of ruining your dress or ending up with an uneven hemline is a common problem people face. However, hemming a dress is not only crucial for achieving a polished and professional look, but it is also a useful skill to have for repairing torn or frayed hems. In this comprehensive guide, we will cover everything you need to know about hemming a dress, from step-by-step instructions for beginners to advanced techniques for different fabrics. Let’s get started!
The Beginner’s Guide to Hemming a Dress: Step-by-Step Instructions
The first step to hemming a dress is to gather all the necessary tools and materials. You will need a measuring tape, pins, scissors, a sewing machine or needle, thread, and an iron. Once you have everything ready, you can start measuring and marking your desired hemline.
Using the measuring tape, measure from the bottom of your dress to your desired hemline. Mark the measurement with pins all around your dress. Make sure your dress is hanging straight and not twisted when marking. If your dress is asymmetrical or has an uneven hemline, make sure to measure each point of the hemline separately. Once you have marked your desired hemline, you are ready to cut the excess fabric.
Take the scissors and cut along the marked hemline, removing the excess fabric. Leave approximately 1 inch of fabric for the hemline.
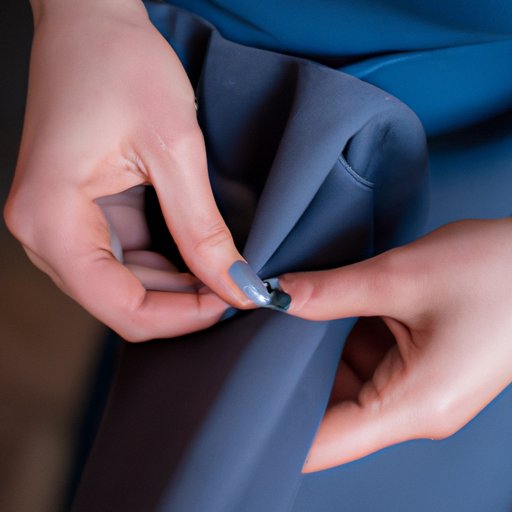
Next, fold and press the hemline up towards the wrong side of the dress. Use the iron to press the hemline flat, making sure there are no creases or wrinkles. Pin the hemline in place around the entire dress.
Finally, sew the hemline using a sewing machine or needle and thread. Use a straight stitch for a neat and professional look. Once you have sewn around the entire hemline, remove the pins and iron the hemline once again for a crisp finish. Your dress is now hemmed and ready to wear!
Don’t forget the finishing touches. Trim any loose threads and give the dress a final iron for a polished finish.
DIY Hemming: How to Save Money and Customize Your Own Dress Length
DIY hemming is a great way to save money and customize the length of your dress to fit your style and occasion. Hemming a dress yourself allows you to adjust the length without having to pay for a tailor or seamstress. It also gives you the opportunity to add your personal touch to your dress.
The tools and materials required for DIY hemming are the same as for hemming a dress, with the addition of fabric glue or hemming tape. Fabric glue or hemming tape is ideal for those who do not have sewing skills or a sewing machine. It is a low-cost and straightforward alternative for hemming a dress.
To hem a dress using fabric glue, start by applying the fabric glue around the bottom edge of your dress. Fold the hemline up towards the wrong side of the dress and press it down firmly on the glue. Hold the hemline in place for a few minutes until the glue dries. Repeat the process around the entire hemline, taking care to apply the glue uniformly. Once the glue is dry, your dress is ready to wear.
Tip: Choose the right type of fabric glue for your dress. Read the instructions carefully and make sure it is compatible with your fabric.
Hemming Techniques for Different Fabrics: Tips and Tricks
Not all fabrics are created equal, and different fabrics require different hemming techniques. The key to a successful hemming is knowing the characteristics of your fabric and choosing the right hemming method. Here are some tips and tricks on how to hem different fabrics such as lightweight, medium-weight, heavy, and stretchy fabrics.
Lightweight fabrics such as cotton, chiffon, or silk require delicate handling to avoid puckering or distortion. A rolled hem is perfect for lightweight fabrics. A rolled hem is a tiny hem that rolls under itself and is practically invisible, giving a very polished look. It is an ideal method for circle or bias-cut dresses, which need a curve hemline. Use a narrow hem presser foot for optimal results.
Medium-weight fabrics such as linen, rayon, or wool require a more structured hemline. A double-fold hem is perfect for medium-weight fabrics. A double-fold hem is a hem that is folded up twice to encase the raw edge, resulting in a clean and secure hem. Use a hem gauge or a sewing ruler to ensure your hemline is even and straight.
Heavy fabrics such as denim, canvas, or leather require durable and robust hemming techniques. A topstitch hem is perfect for heavy fabrics. A topstitch hem is a hem that is sewn on top of your fabric, creating a decorative stitching. It is perfect for jeans or jackets. Use a thick thread and a denim needle to prevent needles from breaking on the thicker material.
Stretchy fabrics such as jersey, knit, or spandex require a flexible hemline. A zig-zag hem is perfect for stretchy fabrics. A zig-zag hem is a hemline that uses a zig-zag stitch to allow for stretch and flexibility. Use a ballpoint or stretch needle for optimal results.
Trick: To avoid fraying, use a small length of fray-check or clear nail polish at each end of the hem to prevent it from unraveling.
How to Hem a Dress Without a Sewing Machine: A Low-Cost Solution
Not everyone has access to a sewing machine or knows how to use one. Hemming a dress without a sewing machine is a low-cost and practical solution. There are different methods to hem a dress without a sewing machine. Here is an overview of the most common methods:
Fabric glue or hemming tape are excellent alternatives for hemming a dress without a sewing machine.
If you don’t have fabric glue or hemming tape, you can also hem your dress using the blind stitch hand-sewing method. The blind stitch method uses hidden stitches that are not visible from the outside, making it perfect for formal dresses or skirts. Start by folding the hemline up towards the wrong side of the dress. Using a hand needle, take a small stitch in the folded part of the hem, catching only a few threads to make the stitch invisible from the outside. Continue stitching around the entire hemline in the same way.
Tip: Use a matching thread color for a seamless look.
Hemming vs. Tailoring: Which Option is Right for You and Your Dress?
Deciding between hemming and tailoring depends on the type of dress and the desired result. While hemming is a straightforward and low-cost solution for shortening a dress, tailoring is a more complicated and expensive process that involves alterations to the entire garment.
If your dress needs significant alterations, such as adjusting the waist, sleeves, or neckline, tailoring is the best option. Tailoring requires expertise and precision that may not be possible to achieve through hemming. It is also ideal for high-end or special occasion dresses that require perfect fitting.
If you need to shorten your dress by a few inches, hemming is the way to go. Hemming is a quicker and more straightforward process that can be done at home or by a tailor. Hemming is also an excellent option for revamping old dresses, giving them a fresh and updated look without spending a lot of money.
Common Hemming Mistakes and How to Avoid Them
Even seasoned seamstresses can make common hemming mistakes. Here are some common mistakes and tips on how to avoid them:
Uneven hemline: Mark your hemline accurately, taking into consideration any asymmetrical or uneven hemlines. Use a ruler or hem gauge to ensure your hemline is straight and even.
Skipping pressing: Pressing your hemline before and after sewing allows for a clean and polished finish. Ensure your iron is set to the correct heat setting for your fabric to prevent any damage.
Not trimming loose threads: After hemming, it is crucial to trim any loose threads to prevent them from unraveling and creating holes in your hemline.
Not testing your thread tension: Ensure your tension is correct before sewing your hemline. Incorrect tension can lead to puckering or loose stitching.
Not using the correct needle: Using the wrong needle can result in broken needles, skipped stitches, or damage to your fabric. Use a needle that is designed for your fabric type and weight.
Fashion on a Budget: Revamp Your Old Dresses with a Simple Hemming Tutorial
Hemming is not only a useful skill for shortening dresses, but it is also an excellent way to revamp old dresses. By changing the hemline of your dress, you can create a new and updated look that matches your style and body type. Here are some ideas for different hemlines:
Above the Knee: Perfect for both casual and formal dresses, an above the knee hemline is ideal for showing off your legs and adding a chic and modern touch to your dress.
Asymmetrical Hemline: An asymmetrical hemline is perfect for adding movement and dimension to your dress. It is an excellent choice for formal dresses or skirts.
Ruffle Hemline: A ruffle hemline is perfect for adding a flirty and feminine touch to your dress. It is an ideal choice for summer dresses or skirts.
Tip: Choose a hemline that compliments your body type. A knee-length hemline is typically flattering for most body types and can elongate the legs.
Conclusion
Hemming a dress can seem like a daunting task, but by following these tips and techniques, you can achieve a polished and professional look. Whether you are a beginner or a seasoned seamstress, hemming a dress is a useful skill that allows you to customize your dress length and revamp your wardrobe. Remember, practice makes perfect, so don’t be afraid to experiment with different hemlines and fabrics.


