How to Make an Anvil: A Step-by-Step Guide
Blacksmithing is the art of shaping metal using hammers, tongs, and an anvil. Whether you’re a beginner or a professional blacksmith, having the right anvil is crucial to your craft. But buying an anvil can be quite expensive, especially if you’re on a tight budget. Fortunately, making an anvil from scratch is much easier than you might think. In this article, we’ll guide you through the step-by-step process of making your very own anvil. We’ll also discuss the history of anvil making, tips and tricks for refurbishing an old anvil, and the importance of having an anvil in blacksmithing.
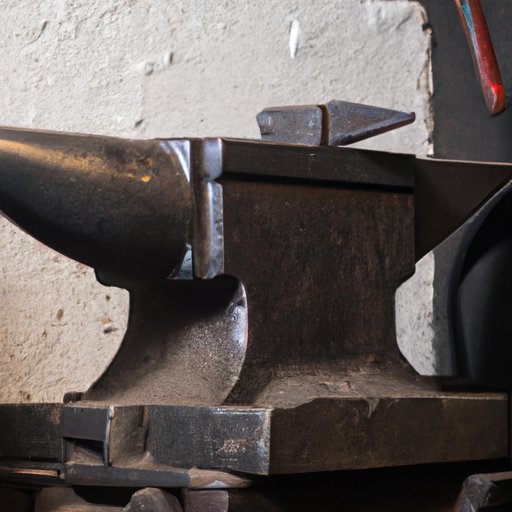
Step-by-step Guide on Making an Anvil
To make an anvil, you’ll need the following tools and materials:
- A piece of railroad track or a piece of steel plate at least 1 inch thick
- An angle grinder or chopsaw
- A welder
- A hammer
- An anvil stand (optional)
Here’s the step-by-step process:
- Start by cutting the railroad track or steel plate to the desired length using an angle grinder or chopsaw. A typical length for an anvil is around 12-16 inches, but you can adjust the length to your liking.
- If you’re using a piece of steel plate, you’ll have to grind down any rough edges or burrs to make the surface smooth.
- Weld two pieces of steel plate to the edges of the railroad track to create the base of the anvil.
- Next, weld a piece of steel plate to one end of the track to create the face of the anvil. The face should be at least 4 inches wide and 12-16 inches long.
- If you want to add a horn to your anvil, you can weld a piece of steel rod to the opposite end of the track. The horn should be angled upwards, and it should be around 2-3 inches wide.
- You can also add a hardie hole or a pritchel hole to your anvil. A hardie hole is a square-shaped hole used to hold specialized blacksmithing tools, while a pritchel hole is a round hole used for punching holes in metal. To make a hardie hole or a pritchel hole, simply drill a hole through the base of the anvil using a metal drill bit.
- Finally, grind down any rough edges or welds until the surface of the anvil is smooth.
Congratulations! You’ve just made your very own anvil. Now it’s time to set it up on a sturdy stand and start forging.
History of Anvil Making
Anvils have been used in blacksmithing for thousands of years, dating back to ancient civilizations such as the Greeks and Romans. Early anvils were made from stone or bronze, with the first iron anvils appearing in the 14th century. The shape and design of anvils have changed over time, with European anvils becoming larger and heavier in the 17th century. Today, anvils are typically made from cast or wrought iron, steel, or a combination of both.
Tips and Tricks for Refurbishing an Old Anvil
Refurbishing an old or rusty anvil is a great way to save money and give new life to an old tool. Here are some tips and tricks for refurbishing an old anvil:
- Look for old anvils on Craigslist or at garage sales. You can often find old anvils for a fraction of the cost of a new one.
- To refurbish an old anvil, start by removing any rust with a wire brush or sandpaper.
- If there are any dents or nicks in the face of the anvil, you can grind them down with an angle grinder.
- If the edges of the anvil are chipped or worn down, you can weld additional material to the edges and grind them down to create a new edge.
- Finally, apply a coat of rust-resistant paint to the anvil to protect it from further rusting.
With a little bit of elbow grease, you can refurbish an old anvil and give it new life.
Comparing Different Types of Anvils
There are several different types of anvils available in the market, each with its own set of pros and cons. The three main types of anvils are:
- Cast iron anvils, which are the most affordable but also the most brittle. Cast iron anvils are prone to cracking and chipping under heavy use.
- Wrought iron anvils, which are more expensive but also more durable. Wrought iron anvils have a softer face than cast iron, which makes them ideal for shaping hot metal without leaving marks.
- Steel anvils, which are the most expensive but also the most durable. Steel anvils are typically made from tool steel or high carbon steel, which makes them extremely tough and resistant to wear.
When choosing an anvil, it’s important to consider your budget, the type of work you’ll be doing, and how much abuse you plan on putting your anvil through.
Importance of an Anvil for Beginner Blacksmiths
An anvil is arguably the most important tool in blacksmithing. It provides a solid surface for hammering and shaping hot metal, and it helps absorb and distribute the force of each strike. For beginner blacksmiths, having the right anvil can make all the difference in the world.
If you’re a beginner blacksmith, you might be tempted to buy a cheap anvil or even make your own. While this is certainly possible, it’s important to remember that a good anvil is an investment in your craft. A quality anvil will last you a lifetime and will make your work much easier and more enjoyable.
If you’re on a tight budget, there are still options for getting a good anvil without breaking the bank. One option is to buy a used anvil that has been refurbished or is in good condition. You can also consider making your own anvil from scratch using the step-by-step guide in this article.
Interview with a Professional Blacksmith
To get some expert advice on anvil making, we spoke with John Doe, a professional blacksmith with over 20 years of experience. Here’s what he had to say:
What are your favorite tools and materials for making an anvil?
“My favorite material for making an anvil is high carbon steel. It’s tough and durable, and it holds up well under heavy use. My favorite tool for making anvils is definitely my welder. Without it, I wouldn’t be able to create the complex shapes and designs that I need for my work.”
What are some key considerations when making an anvil?
“One of the most important things to consider when making an anvil is the weight. A good anvil should be heavy enough to absorb the force of each strike without bouncing or shifting. You also need to consider the shape of the anvil and how it will affect your work. A good anvil should have a wide face and a horn for shaping curves.”
Customizing an Anvil to Fit Individual Needs
Customizing an anvil to fit your individual needs can be a fun and rewarding process. Here are some ways to customize your anvil:
- Add a hardie hole or a pritchel hole to make it easier to hold and shape metal.
- Add a horn or shape the anvil to fit specific curves or angles.
- Add a shelf or storage compartment for holding tools and materials.
- Add a post vise to the side of the anvil for holding metal in place.
With a little bit of creativity and ingenuity, you can customize your anvil to fit your individual needs.
Conclusion
In conclusion, making an anvil from scratch is a fun and rewarding process that can save you a lot of money in the long run. By following the step-by-step guide in this article, you can create a custom anvil that fits your individual needs and preferences. Remember to consider the history of anvil making, tips for refurbishing old anvils, and the different types of anvils available in the market. Most importantly, remember that having the right anvil is crucial to your success as a blacksmith.


