Introduction
If you’re looking for a fun and easy craft to make, look no further than the ninja paper star. This popular origami creation is not only a great way to spend an afternoon, but it is also a beloved item in pop culture. It is often seen in movies and anime as a symbol for ninjas and their skills. In this article, we will guide you through the process of making your own ninja paper star, so even beginners can join in on the fun.
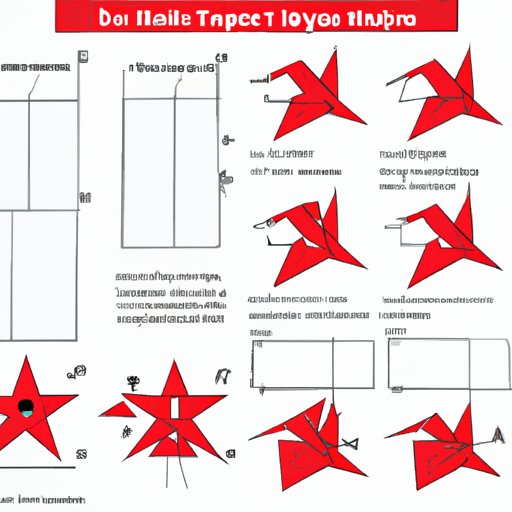
Step-by-Step Guide
Before we get started, you will need a square piece of paper. You can use any type of paper, but origami paper is preferred because of its thinness and ease of folding. Let’s get started!
Step 1: Fold the square paper in half diagonally, so that one corner meets the opposite corner. Run your finger along the crease to make it crisp.
Step 2: Fold the paper in half diagonally again, but in the opposite direction. Run your finger along the crease to make it crisp.
Step 3: Fold the paper in half horizontally, so that the two points on the top of the paper meet. Run your finger along the crease to make it crisp.
Step 4: Fold the paper in half horizontally again, in the opposite direction. Run your finger along the crease to make it crisp.
Step 5: Fold the paper in half vertically, so that the two points on the side of the paper meet. Run your finger along the crease to make it crisp.
Step 6: Cut along the creases to create four squares.
Step 7: Fold each square in half diagonally, so that one corner meets the opposite corner. Run your finger along the crease to make it crisp.
Step 8: Fold each triangle inwards, so that the edge meets the opposite edge. Run your finger along the crease to make it crisp. This will create a smaller triangle shape.
Step 9: Tuck each triangle under the folds of the previous triangle until all four are connected. The points should be facing outwards.
Step 10: Fold the ends inward to create the finished ninja star.
Video Tutorial
A visual guide can be especially helpful for beginners who may not be familiar with the folding process. Check out this video tutorial that demonstrates each step of the process:
History and Cultural Significance
The ninja paper star, also known as a shuriken, has been around for centuries in Japan. It was used as a weapon by ninjas and samurais, and was often made with metal or sharpened edges. However, in modern times it has become a popular craft item and a symbol of ninja skills. The cultural significance lies in the fact that the ninja paper star is a crucial tool for ninjas, and is also seen as an emblem of their strength and agility.
Variations of the Ninja Paper Star
The ninja paper star can be made in different sizes, colors, or shapes. You can even use patterned paper to create unique designs. Try experimenting with different types of paper to see what works best for you. You can also add decorations such as stickers or drawings to personalize your ninja star.
Tips for Beginners
If you are new to origami, it can be helpful to start with larger pieces of paper to make the folding easier. You can also use a ruler to measure and make sure your folds are precise. Finally, be patient and take your time with each step. Mistakes happen, so don’t be afraid to start over if needed.
Conclusion
Now that you know how to make a ninja paper star, it’s time to give it a try! Follow these steps and you’ll have your very own origami shuriken in no time. Remember, practice makes perfect, so keep trying until you are satisfied with your creation.


