Introduction
Crochet is a versatile craft that allows you to create everything from blankets and scarves to clothing and accessories. One of the most important techniques in crochet is the magic circle, also known as the magic ring or adjustable ring. A magic circle is a starting method that creates a tight, closed center for your crochet project. Using this technique can help you achieve a neater, more professional look for your work.
If you’re new to crochet or if you’re a seasoned crocheter who hasn’t tried this method yet, this article is for you. In this guide, we’ll walk you through the process of making a magic circle, explain how it differs from traditional chain loops, and provide tips for using it to create more intricate projects like mandalas and flowers.
A Step-by-Step Guide to the Magic Circle for Crochet Beginners
Before we dive into the specifics of the magic circle, it’s important to understand why it’s such a valuable tool for crocheters. When you’re starting a project, a traditional chain loop can be useful, but it can also leave a hole in the center of your work. The magic circle eliminates this problem by creating a tight, adjustable ring that can be pulled closed as you work.
To make a magic circle, follow these steps:
Step 1: Start by wrapping your yarn around your fingers two to three times, leaving a long tail at the end. The number of times you wrap will depend on the size of your circle – more wraps will create a larger circle.
Step 2: Slide your hook under the first loop of yarn, then over the second loop.
Step 3: Hook the second loop and pull it through the first loop, creating a loop on your hook.
Step 4: Chain one, then work the required number of stitches into the ring. This might involve single crochets, double crochets, or other stitches depending on the pattern you’re following.
Step 5: Once you’ve completed your first round of stitches, carefully pull the tail end of the yarn to adjust the size of the circle. This will close the center of the circle and create a neat, tight ring.
Magic Circles vs. Chain Loops: Which is the Best Starting Method for Your Crochet Projects?
While the magic circle is a useful technique, it’s not always necessary. Traditional chain loops can be a great choice for some projects, particularly those that don’t require a completely closed center. However, in most cases, the magic circle offers greater flexibility and versatility. Here are some of the pros and cons of each method:
Magic Circles:
- PROS: Can be adjusted to fit any size, creates a closed center, creates a neat, professional finish, offers more flexibility
- CONS: Can be difficult to master, requires practice
Chain Loops:
- PROS: Easy to master, perfect for projects that don’t require a completely closed center, requires less yarn
- CONS: Can create a hole in the center of your work, may not look as neat or professional as a magic circle
When choosing a starting method, consider the specific needs of your project. If you’re making a hat or amigurumi that requires a completely closed center, a magic circle is likely your best choice. If you’re making a scarf or shawl that doesn’t require a completely closed center, a chain loop may work just fine.
Tips and Tricks for Making Perfect Magic Circles Every Time
Once you’ve mastered the basics of the magic circle, you can start experimenting with different variations and techniques. Here are some tips and tricks to help you create perfect magic circles every time:
Variations:
- Use multiple wraps to create larger circles
- Hold the tail end and working end of the yarn together when you start, then let go of the tail as you work your way around the circle
- Work more than one round of stitches into the circle to create a spiral effect
Troubleshooting:
- Make sure the loops of yarn are even and snug but not too tight when you start – if the loops are too tight, you won’t be able to pull the center closed
- Practice starting and stopping the magic circle until you get the hang of it
- If your circle isn’t closing properly, you may need to adjust the tension of your stitches or tighten the tail end of the yarn
The Dos and Don’ts of Making a Magic Circle for Crochet
As with any crochet technique, there are certain dos and don’ts to keep in mind when you’re making a magic circle. Here are some key tips to remember:
Do:
- Practice starting and stopping the magic circle until you’re comfortable with the technique
- Experiment with different variations and techniques to create interesting effects
- Be patient and take your time – the magic circle takes practice to master!
Don’t:
- Rush through the starting process – taking your time will help you create a neater, more professional-looking circle
- Get discouraged if it takes you a few tries to get the hang of the technique – practice is key!
- Forget to pull the tail end of the yarn to close the center of the circle – this is a crucial step that will help you achieve a neat finish
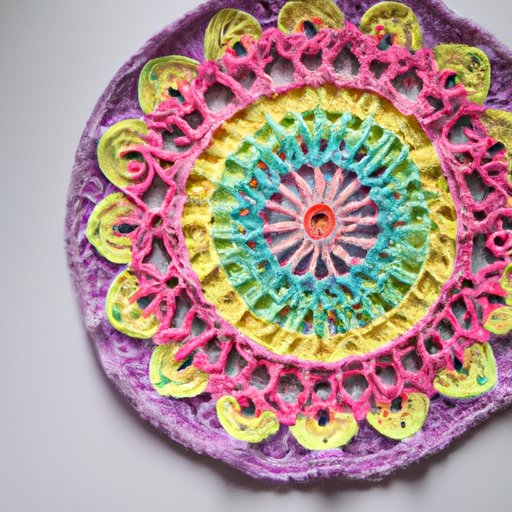
From Magic Circles to Mandalas: How to Use the Magic Circle Technique to Create Intricate Crochet Projects
Once you’ve mastered the basics of the magic circle, you can start using this technique to create more complex projects like mandalas. Mandalas are circular designs that often feature intricate patterns and colors. Here’s how to get started:
Step 1: Make a magic circle and work your first round of stitches as you normally would.
Step 2: For your second round of stitches, start working in the spaces between the stitches from your first round. This will create an open, lacy effect.
Step 3: Continue working in this way, alternating between rounds of solid stitches and rounds of stitches worked in the spaces between the previous round’s stitches. You can experiment with different stitch patterns and colors to create intricate, eye-catching designs.
How to Transform Your Magic Circles into Beautiful Flowers and Other Decorative Motifs
The magic circle technique can also be used to create decorative motifs like flowers, stars, and more. Here’s how to make a basic flower using the magic circle:
Step 1: Make a magic circle and work six single crochets into the circle. Join with a slip stitch to close the round.
Step 2: For the second round, work two single crochets into each stitch from the previous round. Join with a slip stitch to close the round.
Step 3: For the third round, work one single crochet into the first stitch, then two single crochets into the next stitch. Repeat this pattern all the way around the circle. Join with a slip stitch to close the round.
Step 4: For the fourth round, work one single crochet into each stitch from the previous round. Join with a slip stitch to close the round.
Step 5: To finish the flower, sew in the ends and attach to your crochet project as desired.
Conclusion
The magic circle is a valuable tool for crocheters of all skill levels. By following the steps in this guide and practicing the technique regularly, you’ll soon be creating neater, more professional-looking projects. Remember to take your time, experiment with different variations and techniques, and most importantly, have fun!
For more resources on crochet techniques, patterns, and inspiration, check out online communities like Ravelry and Instagram, or explore books and magazines at your local library or bookstore.


