I. Introduction
Have you ever found yourself struggling to tie that perfect bow on your dress?Maybe you end up with a lopsided knot or a small, unnoticeable bow. Well, you’re not alone. The good news is that tying bows is easier than you think. Our guide is here to assist you in learning how to tie a bow on a dress so that you can look stunning at any occasion.
Beyond the aesthetic appeal, there are more reasons why knowing how to tie a bow on a dress is important, and this leads us into the next section.
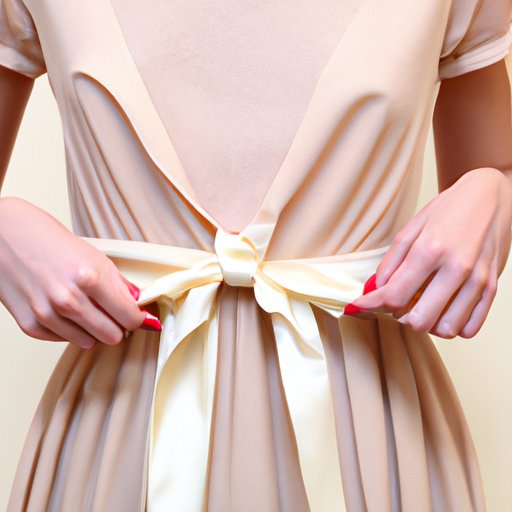
II. Step-by-Step Guide
Tying a bow on a dress requires just a few simple steps. Here is a step-by-step guide that will take you through the process:
A. Looping the Ribbon
Begin by taking the ribbon or fabric, and loop it around your neck and then move the whole material to the back of your dress. Ensure that the longer end is on the right side, whereas the shorter end is on the left side.
B. Creating the First Bow Loop
Take the longer end of the ribbon and make a small loop with it that faces the left side. Ensure that it is not too tight, or else the bow may end up looking misshapen. The loop should be big enough so that once you make the second loop, it will still be even.
C. Wrapping the Ribbon Around
Bring the longer end of the ribbon around to the front of the shorter end, making that first loop secure to the dress. Ensure that when you’re holding the longer end, you don’t mix it up with the shorter end or else things may get complicated.
D. Making the Second Bow Loop
Take the longer end and make a loop in the opposite direction, to the right side of the shorter end. Place the loop on top of the previous loop to make a cross on the part you’re holding. Pinch the loops in the center, somewhere between the loops. Ensure the loops are the same size by adjusting one before the final knot.
E. Adjusting the Size of the Bow
Adjust the bow to your desired size by pulling both loops outward or inward. If one loop is out of proportion to the other, just untie the bow to make a new one.
III. Video Tutorial
Not everyone learns by reading alone. Fortunately, our video tutorial is here to help. Video demonstrations make the process simpler and much easier. So, follow along with our talented instructor and learn how to tie a bow on a dress in no time.
A. Importance of Visual Demonstration
Visuals help to create a sense of understanding when it comes to learning a new skill. It’s easier to replicate the process when you can see how it’s done rather than just reading how it should be done. This is why the step-by-step guide is perfect for those who love to learn by reading. For others like visual learners, the video tutorial is an excellent addition that makes the learning process more effective.
B. Step-by-Step Video Showing the Process
Watch the video and follow this step-by-step guide to tie a bow on a dress as the instructor takes you through it. The video is detailed and should be easy to follow along with.
C. Additional Explanations of the Steps Involved
We will take our time to explain the steps in detail so that you can follow along with ease and tie a beautiful bow.
IV. Infographics
At times, instructions or steps may not be enough to help you understand how to tie a bow on a dress. That’s where the infographic comes in. People respond better to visuals, and that’s why we have created an illustrated guide to help you out.
A. Explanation of the Benefits of Visual Representation
Visuals come in handy when you want to deliver a lot of information within a few seconds. It also helps the audience understand the concept quickly and have something to refer to at any time. The benefit of visual representation is that the process looks less intimidating than it may seem when reading or hearing it.
B. Illustrated Guide to the Steps of Tying a Bow on a Dress
Our infographic is designed in such a way as to take you through the steps with much ease. The visual aids are accompanied by text that explains how to tie the bow correctly.
C. Benefits of an Easy-to-Understand Infographic
Infographics make learning fun and easy. By using simple imagery and text, you can master the skill of tying a bow on a dress in no time. Plus, you’ll also have something to refer to if you forget a step along the way.
V. Breakdowns Based on Bow Material
Different materials require unique handling when tying the bow. It’s essential to understand the material that you’re dealing with when attempting to tie a bow correctly. Here’s a quick breakdown to illustrate how to handle different types of bows:
A. Explanation of Why Different Materials Require Different Knots
The material of the ribbon or fabric that you use can determine the type of knot that is ideal for it. Using the wrong knot with a particular material may not result in the results you want, and can lead to the bow looking odd or slipping altogether.
B. Guides for Tying Bows on Different Material Types
- 1. Silk:
- 2. Cotton:
- 3. Satin:
- 4. Velvet:
- 5. Tulle:
- 6. Lace:
Avoid using heat to adjust the shape or style of the bow. Silk can easily crinkle when exposed to heat. In addition, silk ribbons are fragile and can easily be torn or damaged by heat.
Cotton is another great material for making bows. It is a thick material that carries the structure of the bow with ease. Because of this, pleating cotton material will result in sturdy knots that are easy to manage.
Satin ribbons carry a unique texture that makes it stand out among other materials. The downside is that it can be challenging to tie a bow on the dress. Ensure that the ribbon is not too thick or else the bow will be too bulky.
Velvet has a luxurious texture that gives it a rich look. Consider using a wired ribbon if you’re looking to tie a bow with velvet material since it can easily maintain its shape and will also be much easier to control.
For tulle material, consider using a wire or thicker ribbon to ensure that the bow holds its shape once created. You could also use glue to ensure that the bow remains in place, particularly if you’re dealing with a veiled tulle material.
Lace ribbons are elegant and give a stunning appeal. So, in case of a lace dress, you should always consider using a skinnier ribbon and a more floppy style for the bow. This allows the ribbon to collapse comfortably and will ensure a proper knot that complements the dress.
VI. Tips and Tricks
Tying a beautiful bow on a dress may seem easy once you understand the steps and materials involved, but there are always tips that can help in the process:
A. Essential Tips That Will Help You Tie the Perfect Bow
- Tying Multiple Bows:
- Ensuring Symmetry:
- How to Curl the Ribbon:
It’s advisable to practice tying knots ahead of time until you feel confident enough to tie them properly. Practice not only on one material but several materials to gain confidence.
Ensure that each bow loop is equally sized and symmetrical before tying the knot. In case they differ, adjust the loops until they are equal.
Take a pair of scissors and run them across the underside of the ribbon to create curls. The sign should be short, and the ribbon should be held at a 45-degree angle with the scissors. Once you’ve completed one side, turn the other side and repeat until satisfied.
B. Explanation Why These Tips are Important
These tips can make the whole process much easier. They are especially beneficial for beginners who may find the process challenges. With the help of the right resources, you can achieve a perfect and professional bow around your dress every time you try.
VII. Dress Specifics
Tying a bow on any dress is beautiful, but understanding what type of dress you’re working on and how best to tie it will ensure that you get the best-looking bow. Therefore, the following are specific guidelines on the various dresses and how best to tie a bow on them.
A. Introduction to Dress Types That Require Bows
Bows are a great way to accessorize and add some glamor to any dress. Whether it’s a prom dress, cocktail dress, wedding dress, or evening gown, a bow can add some elegance and vibe to the entire outfit.
B. Guides for Tying Bows on Different Dress Types
- Prom Dresses:
- Wedding Dresses:
- Cocktail Dresses:
- Evening Gowns:
Prom dresses are one of the beautiful styles that look excellent with a bow. It provides a touch of sophistication and elegance. To achieve the right knot, use a wire ribbon to create a bow that will hold well throughout the night.
The wedding dress is arguably the most important aspect of a wedding ceremony. A bow is an excellent way to add some flair to the wedding dress. It will help to add a classy and sophisticated air. Choose thin ribbons to accentuate the dress without drawing too much attention away from the rest of the outfit.
Cocktail dresses are perfect for those who want to showcase their legs and want to dress up but hate the formal attire that comes with evening parties. A bow will add some glamor and style while maintaining an excellent formal look.
Evening gowns can benefit from the use of a bow, but remember to keep it minimalistic so that it doesn’t draw too much attention from the dress. Use delicate and thin wires to keep it in place, and remember to consider the dress’s color for a good blend.
VIII. “Do’s and Don’ts”
Tying a bow on a dress doesn’t have to be complicated, but there are certain things that you should avoid doing when tying the knot, and here is a list to prevent poor knots and keep the bow looking perfect:
A. Explanation of Common Mistakes People Make While Tying a Bow
- Forgetting to Twist the Ribbon:
- Improper Bow Size:
- Mismatched Loops:
Twist the ribbon so that it looks polished when you finish your knot.
Ensure that your bow’s size is proportionate to the dress. A smaller bow works well on a casual dress, whereas a bigger bow is more suited to formal occasions.
The bows’ loops should be the same size to achieve symmetry. Adjust them as necessary, so that they can be as symmetrical as possible.
B. Tips for Maintaining Proper Knots
If you want a well-tied knot that can last for a long time, it’s important to maintain the knot. Here are the best tips:
- Use Proper Knots:
- Be Gentle:
- Adjust or Retie:
Using the right knot is crucial for proper maintenance. Practice different knots with different materials to identify the best knot for each material.
Very drastic and aggressive movements will ruin the knot easily. Be gentle when wearing the dress and avoid tugging and pulling.
If you notice that the knot has become loose, it’s better to untie it and make a new one rather than trying to adjust it to fit better. This will make the bow look haphazard and will ruin the overall look of the outfit.


