I. Introduction
If you’re looking to install a doorbell and aren’t sure where to start, you’ve come to the right place. The purpose of this article is to provide you with a comprehensive guide to wiring a doorbell. Knowing how to wire a doorbell is important because it ensures that the device is installed properly and functions correctly. Additionally, crafting your own doorbell setup gives you complete control over its design, volume output, and other important features.
II. Step-by-Step Guide
The following tools and materials are necessary for wiring a doorbell:
- Doorbell button
- Transformer
- Wires
- Screwdriver
- Drill
- Wire cutters
Here are the steps to wire a doorbell:
- First, find the transformer that is intended to power your doorbell. Most houses will have a transformer somewhere in the basement or possibly in the attic. In some cases, it may be outside somewhere around the front of the house or near the electrical meter. Ensure that it’s plugged in and turned on.
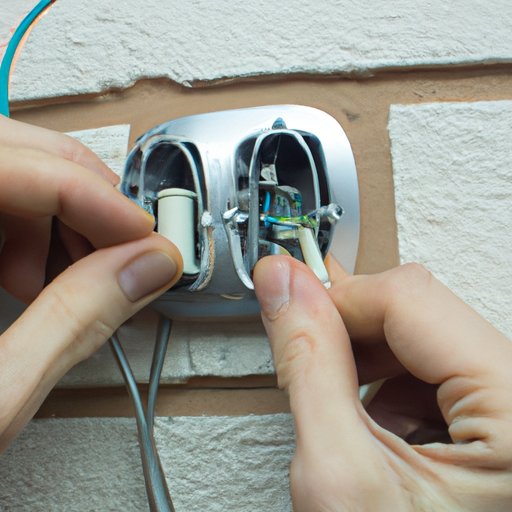
- Locate your doorbell button, usually found near the front door or wherever you want visitors to ring it. This will connect to one end of a wire, and the other end of the wire will connect into the front screws of the transformer.
- Connect the other side of the transformer to the other screw on the doorbell button.
- Attach the white wire to the front terminal of the doorbell button, and the green wire to the terminal located at the back of the button.
- Drill a hole behind the doorbell to mount the button, and connect those wires to the button itself.
- After attaching the cover to the doorbell button, test to see if it works correctly.
III. Troubleshooting
Wiring a doorbell is a relatively straightforward process, but things can go wrong at times. Common issues include improperly attached wires or even wiring mix-ups.
If you face these issues, here are some solutions:
- If the doorbell isn’t working, double-check that the wires are tightly connected to the screws of the doorbell and the transformer.
- For situations where the doorbell is ringing continuously, disconnect the wire connected to the screws of the transformer, which will immediately stop the ringing.
- You should also ensure the transformer is installed correctly and that it supplies enough voltage for the doorbell to work correctly. Transformers can be either 10 volts or 20 volts and appropriately sized to the doorbell system. Check the transformer manual to know which is ideal for the device you have acquired.
To avoid issues from the start, here are some tips:
- Ensure you purchase a doorbell system that is compatible with your transformer and your household’s electrical systems.
- Consider hiring a professional electrician to handle any installation if you’re not comfortable working with power tools and electrical connections.
- Avoid overloading your transformer, which can lead to malfunctions or insufficient power supplied to your doorbell. Ensure that the transformer can handle the amps required by your doorbell system.
IV. Video Tutorial
A video tutorial can be an incredibly useful guide because it enables you to see precisely how each step is performed. This guide can be posted on online platforms like YouTube or Vimeo. The following steps are necessary:
- Prepare all your tools and supplies before recording.
- Use a camera that can provide a clear and comprehensive view of the process.
- Ensure good lighting and sound quality.
- Prepare the right scripting, keep it short and straightforward.
V. Images and Diagrams
The accompanying visuals are just as essential as the written guide. The following are photographs and diagrams you can do:
- High-resolution photographs of the tools and materials required for a successful installation.
- Clear, annotated diagrams or illustrations that show precisely how to connect wires, mount the doorbell button, connect the transformer, and other essential steps. These visuals should be labeled yet simple to understand for any homeowner.
VI. Expert Tips
Getting advice from an experienced electrician or doorbell installer can provide additional insights into the installation process. Some tips to consider are:
- When purchasing a doorbell system, look for models with an adjustable volume, flash features, and other smart tech enhancements for more convenience.
- Ensure that you understand the doorbell system’s unique features and how to program it correctly for best results.
- The transformer should always be installed in an easily accessible location, with adequate space for ventilation to keep it cool.
- Install doorbell systems in visually appealing locations so that they aren’t an eyesore. This setup will blend well with other decorative elements of your home and make it more attractive.
VII. Conclusion
Wiring a doorbell is not difficult, as long as you know the fundamental steps to take. With this comprehensive guide, we hope that you will have the knowledge and confidence to install your own doorbell. Remember to keep safety in mind first and foremost, and don’t hesitate to seek assistance from an experienced electrician if necessary. By following the guide, you’ll have a great doorbell that can add convenience and security to your home, all while being installed correctly and functioning correctly.


